Oven-Baked Cheesy Tacos (Crispy & Loaded)
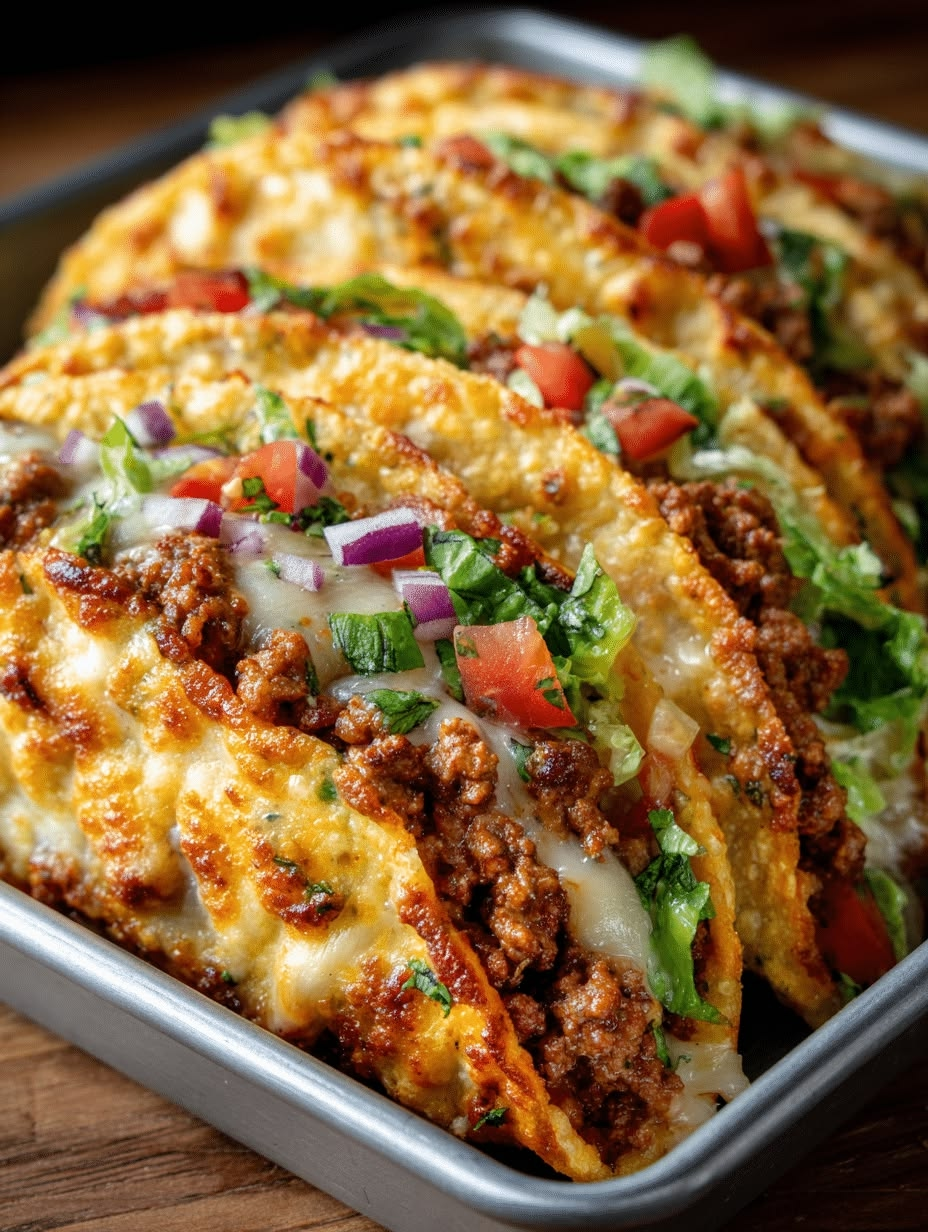
These Oven-Baked Cheesy Tacos are crispy on the outside, juicy and flavorful on the inside, and loaded with seasoned ground beef, melted cheese, fresh lettuce, tomatoes, and red onions. Baking the tacos together makes preparation easy while giving the shells a delicious golden crunch.
Perfect for busy weeknight dinners, family gatherings, game days, or taco night!
Preparation Time: 15 minutes
Cooking Time: 15–20 minutes
Total Time: 30–35 minutes
Servings: 8 tacos
Difficulty: Easy
Ingredients
For the taco filling
-
1 lb (450 g) lean ground beef
-
1 tablespoon olive oil (if needed)
-
1 small onion, finely diced
-
2 cloves garlic, minced
-
2 tablespoons taco seasoning
-
½ teaspoon ground cumin
-
½ teaspoon smoked paprika
-
¼ teaspoon black pepper
-
½ teaspoon salt, or to taste
-
⅓ cup tomato sauce or salsa
-
¼ cup water
For assembling the tacos
-
8 hard taco shells or sturdy tortillas folded into taco shapes
-
1½ cups shredded cheddar cheese
-
1 cup shredded Monterey Jack or mozzarella cheese
-
1 cup shredded lettuce
-
1 cup diced fresh tomatoes
-
¼ cup finely chopped red onion
-
2 tablespoons fresh cilantro, chopped
Optional toppings
-
Sour cream
-
Guacamole
-
Sliced jalapeños
-
Salsa
-
Hot sauce
-
Fresh lime wedges
Instructions
Step 1: Prepare the oven
Preheat your oven to 400°F (200°C). Lightly grease a baking dish or rimmed baking tray.
Step 2: Cook the ground beef
Heat a large skillet over medium heat. Add the ground beef and cook for 5–7 minutes, breaking it into small crumbles with a spoon.
Cook until browned and no longer pink. Drain excess grease if necessary.
Step 3: Season the filling
Add the diced onion and cook for 2–3 minutes until softened. Stir in the minced garlic, taco seasoning, cumin, smoked paprika, black pepper, and salt.
Add the tomato sauce or salsa and water. Mix thoroughly and simmer for 3–5 minutes until the mixture thickens slightly.
Remove from heat.
Step 4: Prepare the taco shells
Arrange the taco shells upright in the prepared baking dish, placing them close together so they support one another.
If using soft tortillas, fold them gently into taco shapes and arrange them snugly.
Step 5: Add the filling
Spoon the seasoned beef mixture evenly into each taco shell.
Avoid overfilling so the tacos remain easy to handle.
Step 6: Add the cheese
Sprinkle shredded cheddar and Monterey Jack cheese generously over the beef filling.
Make sure each taco gets plenty of cheese for a delicious, melty topping.
Step 7: Bake until crispy
Place the baking dish in the preheated oven and bake for 8–12 minutes, or until the cheese is completely melted and bubbly and the taco shells are golden and crispy.
Keep an eye on them to prevent the shells from becoming too dark.
Step 8: Add fresh toppings
Remove the tacos from the oven and let them rest for 2 minutes.
Top with shredded lettuce, diced tomatoes, red onion, and fresh cilantro.
Step 9: Serve and enjoy!
Serve immediately with sour cream, guacamole, salsa, or lime wedges. Enjoy these crispy, cheesy, flavor-packed tacos while warm!
Helpful Tips for Perfect Crispy Tacos
-
Use freshly shredded cheese: It usually melts more smoothly than pre-shredded cheese.
-
Don’t overfill: Too much beef can make the shells difficult to handle.
-
Keep the filling thick: Excess liquid can make taco shells soggy.
-
Bake close together: Arranging shells snugly helps them stay upright.
-
Add lettuce after baking: This keeps the vegetables fresh and crunchy.
-
Make them spicier: Add cayenne pepper, chili flakes, or diced jalapeños to the beef.
-
For extra crispiness: Lightly brush the outside of soft tortillas with olive oil before baking.
Nutritional Information
Estimated values per taco, based on 8 servings. Actual values vary with shell size, meat fat percentage, cheese, and toppings.
| Nutrient | Amount |
|---|---|
| Calories | 330 kcal |
| Protein | 21 g |
| Total Carbohydrates | 20 g |
| Dietary Fiber | 2 g |
| Net Carbs | 18 g |
| Total Fat | 19 g |
| Saturated Fat | 8 g |
| Sugar | 2 g |
| Cholesterol | 65 mg |
| Sodium | 580 mg |
Nut Information & Allergen Guide
Are these tacos nut-free?
Yes! The basic recipe does not require peanuts, almonds, walnuts, cashews, pecans, or other tree nuts.
Nut information:
-
Peanuts: Not included.
-
Almonds: Not included.
-
Walnuts: Not included.
-
Cashews: Not included.
-
Pecans: Not included.
-
Pistachios: Not included.
-
Hazelnuts: Not included.
-
Macadamia nuts: Not included.
Potential allergens:
-
Milk: Cheddar, Monterey Jack, mozzarella, and sour cream.
-
Wheat: Some taco shells and tortillas.
-
Soy: May be present in certain packaged taco seasonings or tortillas.
Allergy advice: Always check ingredient labels for cross-contamination and shared manufacturing equipment. For a dairy-free version, use a suitable dairy-free cheese alternative.
Frequently Asked Questions (Q&A)
Q1: Can I make these tacos ahead of time?
Yes! Prepare the seasoned beef filling up to 2 days ahead and refrigerate it in an airtight container. Assemble and bake the tacos just before serving.
Q2: Can I use ground chicken or turkey instead of beef?
Absolutely! Ground chicken or turkey works beautifully. Cook ground poultry to an internal temperature of 165°F (74°C).
Q3: How do I prevent soggy taco shells?
Keep the meat mixture thick, drain excess grease, and avoid adding watery toppings before baking. Add lettuce and tomatoes after baking.
Q4: Can I use soft tortillas?
Yes! Fold small flour or corn tortillas into taco shapes. Arrange them tightly in the baking dish so they hold their shape.
Q5: What cheese works best?
Cheddar, Monterey Jack, mozzarella, and Mexican cheese blends are excellent choices.
Q6: Can I make these tacos spicy?
Yes! Add diced jalapeños, hot sauce, cayenne pepper, or extra chili powder to the beef mixture.
Q7: Can I freeze the tacos?
You can freeze the cooked beef filling for up to 2–3 months for best quality. Thaw overnight in the refrigerator and assemble fresh tacos when ready. Fully assembled tacos are best enjoyed fresh because the shells can lose their crispness.
Q8: How do I store leftovers?
Store leftover beef separately from fresh toppings and taco shells in airtight containers in the refrigerator for up to 3–4 days.
Q9: How do I reheat leftover tacos?
Reheat assembled tacos in an oven or air fryer at 350°F (175°C) until hot and crispy. Add fresh lettuce and tomatoes afterward.
Q10: What can I serve with oven-baked cheesy tacos?
They pair wonderfully with:
-
Mexican rice
-
Refried or black beans
-
Corn salad
-
Guacamole and tortilla chips
-
Fresh salsa
-
Mexican street corn
-
Cilantro lime rice
Q11: Are these tacos keto-friendly?
Traditional taco shells contain carbohydrates, so this version isn’t strictly keto. You can make a lower-carb version using cheese shells or low-carb tortillas.
Q12: How do I know when the ground beef is safely cooked?
Use a food thermometer to ensure ground beef reaches 160°F (71°C).
FoodSafety.gov+1
Serving Suggestions
Serve these tacos hot with a generous spoonful of guacamole, creamy sour cream, fresh salsa, and a squeeze of lime. They’re delicious as a complete family dinner or as part of a fun taco-night spread.
Final Result: Golden, crunchy taco shells filled with juicy seasoned beef, bubbling melted cheese, and colorful fresh toppings. Every bite is cheesy, savory, crunchy, and absolutely satisfying!